Standardized Inspection Improves Throughput and Tolerances
Automating inspection leads to higher throughput — but what else does it enable? In this article, learn how Deublin’s Mainz, Germany, facility has been able to better specify tolerances through a versatile metrology device.
Share


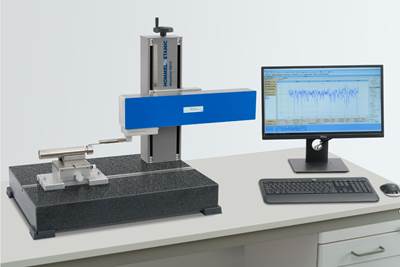
A standardized metrology process is a successful metrology process, but this goal grows more complex as the types of measurements needed increases. , a multinational manufacturer of rotating unions, knows this to be true — with more than 1,000 turning operations across a wide variety of components, the company long had difficulties standardizing its measurement practices, much less automating them. These difficulties have come to an end as the company’s facilities adopt Waveline W900 systems from (a member of the Jenoptik Group), which combine multiple gaging operations onto one device and have helped begin the process of standardizing Deublin facilities’ metrology operations.

In addition to the W900, the Deublin Mainz team has purchased three other Waveline machines. The company also plans to add Waveline machines to its locations around the world. Images courtesy of the Jenoptik Group.
More Tasks, More Parts, More Little Differences
Deublin manufactures hundreds of part numbers, and customer demand is growing past the company’s current output of several hundred thousand rotary unions per year across its facilities. As the company ramps up production worldwide, it needs metrology systems to keep pace, which requires a system that can work equally well manually, programmed by a CNC and fully automated. The company also requires consistency between its production sites, so it needs a metrology system with support for revision control of its programs.
To ease these ends, Deublin needed to find a system that could perform both contour and roughness measurement, rather than one or the other. The ideal system also supported both horizontal and vertical measurement, as well as magnetic coupling and RFID tooling identification to facilitate swift tool changes and changeovers between measurement tasks.
Standardization Meets Versatility
After encountering Hommel Etamic’s Waveline W900 at a trade show in 2022, Deublin’s Mainz, Germany, facility purchased one of the systems and the company’s Nanoscan probe. The system itself can move and measure both horizontally and vertically, while the Nanoscan probe is one of two Hommel Etamic supplies to measure both contours and roughness. The touch probes have a resolution of 0.3 nanometers over the full 24-millimeter measuring range. Combined, these capabilities enable the machine to simultaneously play roles that would have required different measurement instruments.
The modular system also met Deublin’s requirements for magnetic coupling and RFID support, and Hommel Etamic’s onboard Evovis software provides a method to store programs, view measurement data, communicate with the facility’s Universal Robots cobots, and set up automatic contour recognition through connectivity to Universal Robots’ programming software. The Evovis software can distinguish between parts that meet tolerance specifications, those that don’t and those that could meet specifications after rework, communicating with the cobot servicing Deublin’s W900 to move parts to the appropriate pallet. Deublin’s team enters parts, shop order numbers and the production machine for the job via a scanner gun, and the software automatically logs pictures of the component, part and drawing with each measurement for full traceability.

Deublin has equipped its Waveline W900 devices with Hommel Etamic’s Nanoscan probes, which can measure both contours and surface roughness. The Nanoscan probe’s 0.3 nm resolution over its 24-mm measurement range is vital for confirming Deublin Mainz’s tolerances.
Deeper Data, Faster Throughput
Sven Könenkamp, Deublin Mainz’s computer-added quality administrator and CMM global team coordinator, says the team has already stored standard measurements and metrology programs in the W900’s Evovis software and is continuing to add as many part-specific operations and part-measurement programs as possible. Könenkamp says this will likely take somewhere between a year or two, though the largest challenge in developing the necessary measurement sequences comes largely from creating a safe fixturing and part-reception situation that enables smooth, automating part loading and unloading.
In addition to facilitating a wide variety of measurements, Könenkamp says the W900’s Evovis software provides more detailed measurement results than the facility was able to previously capture. This includes data the shop did not previously have, and which Deublin has since used to adjust tolerance ranges to be more accurate for some of its products.
Thus, Könenkamp says that despite the time to prepare metrology programs for any single part being about the same as it would be for other systems, the Waveline W900 and its software have proved a major benefit to the shop. Combining multiple metrology processes onto one machine has led to approximately 30% faster system throughput, with specialists able to find ways to further improve this during staffed operation and cobots able to continue measuring parts even during lights-out hours. The system has also eliminated operator variance in measurement of the company’s parts, and this combination leaves Deublin better equipped to tackle the growing demand for its rotary unions.
Related Content
Orthopedic Event Discusses Manufacturing Strategies
At the seminar, representatives from multiple companies discussed strategies for making orthopedic devices accurately and efficiently.
Read MoreMeasuring Torque, Thrust Force for Smart Drilling Operations
To monitor drilling operations for smart manufacturing solutions, torque and thrust force can be measured.
Read MoreUsing Digital Tap Testing to Measure Machining Dynamics
Tool-toolholder-spindle-machine combinations each have a unique vibration response. We can measure the response by tap testing, but we can also model it.
Read MoreMarathon Precision’s Engineering Playground: One Shop’s Secret to Sustaining High Tech, Low-Volume and High Morale
Half an airplane on the wall, a ten-foot metal dragon, and a full-blown recording studio might not scream “manufacturing efficiency,” yet Marathon Precision proves otherwise. Here’s how forging, complex CNC operations and staff-driven creative projects combine to fuel the shop’s productivity and profitability.
Read MoreRead Next
How to Choose the Correct Measuring Tool for Any Application
There are many options to choose from when deciding on a dimensional measurement tool. Consider these application-based factors when selecting a measurement solution.
Read MoreHow to Evaluate Measurement Uncertainty
Manufacturing and measurement are closely coupled. An important consideration for the use of measurement results is the associated measurement uncertainty. This article describes common metrology terms and provides an example uncertainty analysis.
Read MoreHommel-Etamic Measurement System Offers Modular Design
The W600 series features high measurement quality, free access to measuring points, rapid changeover of the probe system, automatic probe and probe arm recognition.
Read More


